


Roblox. Given that they claim to have over ninety million active users a month, odds are pretty good that you’ve either played it or heard of it. For everyone else, Roblox is a platform for making 3D games with Lego-looking characters that can be used to create all sorts of free games to share with other people. It’s easy to pick up and play, but getting started coding with it can be a little intimidating. That’s what we’re going to tackle in this article!
To start with, you need to go to https://www.roblox.com/create to download Roblox Studio, the big chunky development platform for making Roblox games. After you log in, you should see a series of options that looks like:
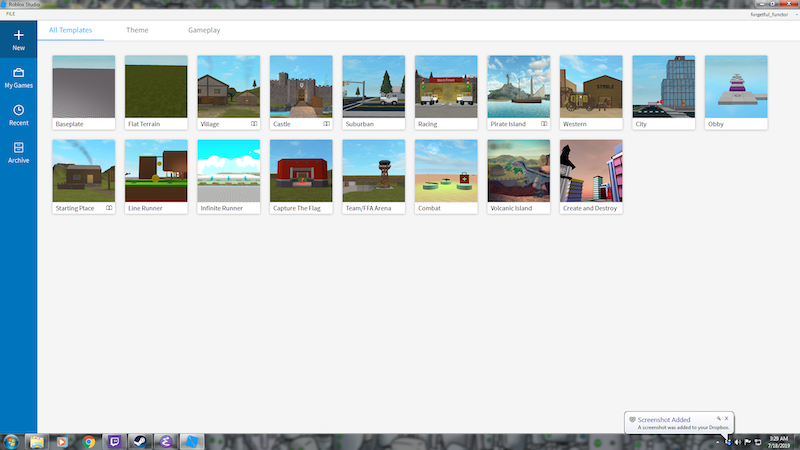
For the purposes of this introduction, select the option for “Baseplate”. This is the absolute minimum environment in Roblox!
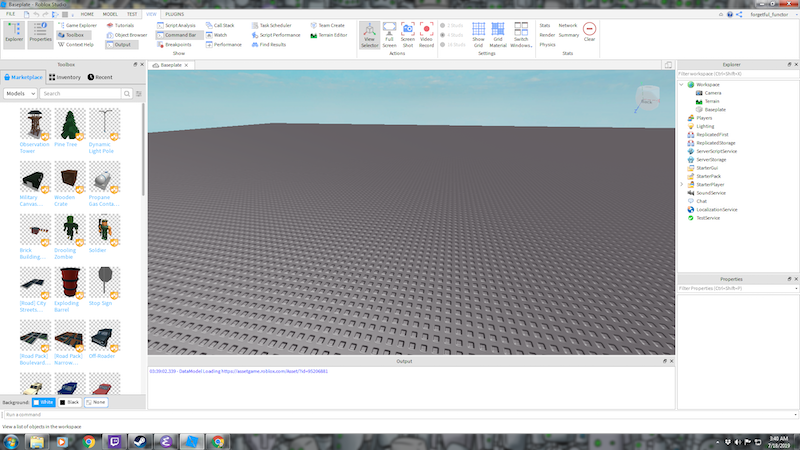
Let’s talk a little bit about what you’re seeing here: this is the development environment for Roblox. It shows you all the things you’ve put in the game as well as a bunch of menus and informational windows about all the objects in the game. To make things easier, I recommend clicking on the “View” tab and then making it look like:

This lets us have windows that list all the items in our game as well as all the ways we can modify them.
Our very first test is to place some basic shapes by clicking on “Part”. If you click on the little black arrow under the word “Part” you’ll see that you can choose a few basic shapes to add into the game.
Every time you add something you’ll see a new thing be added to the “Explorer” window on the right-hand side of the screen. If you click on it, you’ll be able to see the properties of the object: its color, what its made of, and even things like its position and speed. Just for fun, set the y-velocity of one of the objects you placed to a big number and start the game. Hopefully you saw it shoot off right into the air then fall back down again!
What’s that? It happened really fast? Huh! I wonder how one would slow it down?
This is a good opportunity to go into something I think is missing from a lot of Roblox introductions: how do you code objects?! To start, click on the part you added in the Explorer tab and you should see a little “+” symbol that you can click on to add a child. Add a new script and replace the print(“Hello, World!”) with the following Lua code:
thing = script.Parent

thing.Velocity = Vector3.new(0,0,0)
wait(15)
thing.Velocity = Vector3.new(0,200,0)
Let’s talk out some of the concepts at play here:
- Since the script you made is a child of the part, you can get access to the part itself with script.Parent.
- We make sure the object is still at the beginning by giving it a velocity (which is like speed but where you list the speed in each direction instead of a single number like 55 MPH) where each of the three components is zero.
- We wait fifteen seconds.
- Then we set the velocity of the part to go straight up.
Now try your game again and stare intently at the part you put down. Wait for it… and pop! It goes into the air.
At this point, you can start playing around with the building tools. I’m de-emphasizing them a little bit here because the Roblox site has a number of tutorials that already cover how to place things. I will say that you should play around with hinges in order to try out how to connect objects together.
The next big concept I want to cover is how to make objects while the game is running.
Go to the ServerScriptService item in the Explorer and add a new script, then add the following code inside it:
function makePart()
	local newPart = Instance.new("Part", workspace)
	newPart.Position = Vector3.new(math.random(-50,50),0,math.random(-50,50))
	return function ()
		newPart.Velocity = Vector3.new(0,200,0)
	end
end

jumper1 = makePart()
jumper2 = makePart()
jumper3 = makePart()

wait(5)
jumper1()
wait(5)
jumper2()
wait(5)
jumper3()
Here we defined a function to make new parts that returns a function, a closure actually (which is explained in a different article in this issue) that when called makes the part “jump”. We make new jumpers by calling this function and, one by one, make all three new parts jump!
This is a pretty bare bones example but it shows how just a little bit of Lua code can go pretty far! So try out Roblox, have fun with it, and use it as an opportunity to sharpen your coding chops!
Happy hacking!
Learn More
Roblox
https://en.wikipedia.org/wiki/Roblox
Wizard Tycoon
https://www.roblox.com/games/281489669/Wizard-Tycoon-2-Player
Roblox studio
Studio basics
https://developer.roblox.com/en-us/learn-roblox/studio-basics
Roblox Studio
https://www.wikihow.com/Use-Roblox-Studio
Roblox coding courses
https://codakid.com/roblox-coding/
Walk-through Brick in Roblox
https://www.instructables.com/id/How-to-Make-a-Walkthrough-Brick-in-Roblox-Studio-U/
Game Creation Tools
Roblox Foundations
https://mycodecentral.com/portfolio-items/roblox-foundations/