
SketchUp is a free and fun program for 3D modeling. You can use SketchUp to design just about anything, from furniture to a dream bedroom to an entire city.
There is a downloadable version called SketchUp Make, which you can get at https://www.sketchup.com/download/all. But there is also a web-based version which works right in your Internet browser. This version is called my.sketchup, and to use it just go to www.my.sketchup.com.
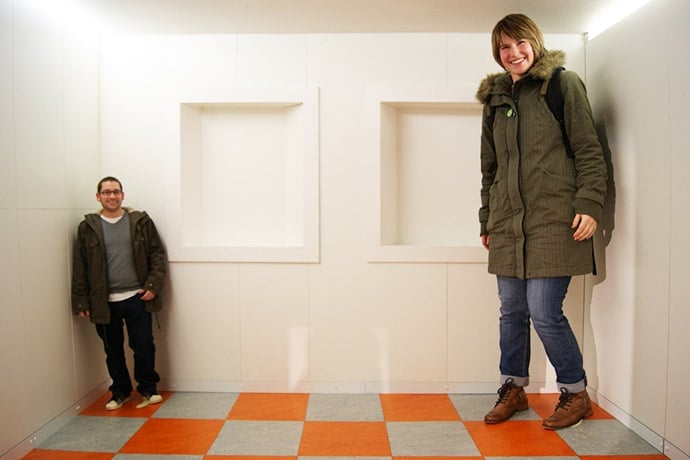
The Ames room is one of the most famous optical illusions. When a real Ames room is built, it has distorted walls and floor, and only allows the viewer to see inside the room through a small pinhole. This limited view makes it impossible to tell that the room is distorted. And when the viewer sees a person walk from one corner to the other, the person appears to grow or shrink.
And if you can’t build the actual room, the next best thing is to show it as a 3D model.
When you open SketchUp, you’re in this view, with Josh standing on the ground. He isn’t needed in this model (at least not yet), so press E for the eraser, and click on any of Josh’s edges. We’ll bring Josh back later to test the illusion.

Now we can start the room. To get make the room a reasonable size, we want to start in Plan view (also known as top view or bird’s eye view). Click the Views icon on the right side.

In the Views window, click the Top view icon.

Now we’re looking straight down at the “ground.”
To draw the floor, press R for the Rectangle tool. Click one corner to start, and keep an eye on the dimensions which are listed in the lower right corner. The room should be a normal size for a person – in this example, about 15’ wide and 22’ long. Be sure to orient your rectangle so that the longer side is along the green direction.

Orbit (drag the mouse while pressing the middle mouse button) to get to a view like this.

Press P for Push/Pull. Click the rectangle, move the mouse to pull it up, and click again when your room is about 8’ or 9’ tall.

To make it possible to see inside the room, press E again for the Eraser, and click the top edge closest to you.

Now the top and front walls are gone.

To distort the room for the illusion, we have to adjust the walls and floor. Press M for the Move tool, and place your mouse on the edge shown below. Click to start the move.

Move this edge straight back, sticking to the green direction. Click again when finished. Now the left wall is longer than the right.

Now orbit to a view like this, looking straight into the room and facing the back wall. The front of the room should be outside the view – it should seem as if you’re entirely in the room.

Some of the room’s edges need to be adjusted, to make the room look normal. Press the Spacebar to activate the Select tool, and select the edge shown below.

Move this edge straight up, sticking to the blue direction. Finish the move when the bottom of the back wall looks perfectly horizontal.

Do the same for the top edge of the same wall: select it first, then move it so that the top of the back wall appears horizontal.

This is a very important step: saving this view. If you were to zoom out or orbit away, you could easily tell that the room is distorted. But for the illusion, the viewer has to be seeing the room in this exact view.
Go back to the Views window and click the + icon to create a new scene.

The new scene is created, with the default name of “Scene 1.” The scene thumbnail (small picture) is what you click when you want to return to this view. Try it out – zoom out or orbit, then click the scene thumbnail.

To enhance the illusion, this room should have something on the walls – windows or hanging pictures. Use the Rectangle tool to draw two or three rectangles along the back wall. Of course, these rectangles look distorted, though it’s actually the room that’s distorted.

We can “fix” these rectangles the same way we fixed the walls and floor. Press M for move, and be sure that nothing is already selected. Click a rectangle corner that you want to move, and move it to a new spot so that the rectangles edges look correct. Click again to finish.

Here’s how your rectangles should look after adjusting:

To give the room some color, open the Materials window.

Click the Browse icon, and open one of the material categories, such as “Colors” shown below.

Choose some colors and paint the rectangles.

Add a few rectangles along the side walls as well. These look a bit distorted as well if you look closely, but not enough that anyone will notice. Paint these as well, and add some material to the floor.

Now we can test the illusion. Even though we erased Josh at the beginning of this project, he’s still in the model. Open the Components window.

Click the House icon which displays all components in the model. Which should include only Josh.

Click Josh’s thumbnail to attach the component to your cursor. Place Josh in one back corner of the room – it’s easiest to do this when looking down into the room.

Then place another Josh in the other back corner.

Go back to Scene 1 in the Views window. Now it appears once again that you’re standing in the room, and the two Joshes look quite different.

This makes sense – the smaller Josh is actually standing farther away from the viewer. But because the room appears normal, Josh appears much smaller than he actually is.
If you want to prove to a viewer (or yourself!) that these components are the same size, select one and move it toward the other. As long as you’re moving the selected Josh along the floor (look for the “On Face” popup), you’ll see how he appears to grow or shrink.

Learn More
About the Ames Room
https://www.zmescience.com/other/feature-post/optical-illusion-ames-room/
SketchUp Resources
www.my.sketchup.com
https://mastersketchup.com/sketchup-tutorials/
http://www.thesketchupessentials.com/sketchup-tutorials/